
A compact row house has to do several jobs at once: fit within a narrow footprint, stay within a realistic construction budget, protect household privacy, bring in daylight, and remain comfortable through changing weather. Because party walls usually close off both sides, natural airflow needs deliberate planning rather than a last-minute window choice. A low cost row house design with passive ventilation begins by treating air movement as part of the site plan and floor plan.
The most useful measures are often simple spatial and architectural choices, not expensive mechanical equipment. The ideas below should be adapted to the local climate, orientation, site conditions, neighborhood context, building codes, and advice from qualified local professionals.
Start With a Compact Row House Layout That Supports Air Movement
Attached walls limit the sides where windows can be installed, so many row houses depend on the front and rear elevations for daylight and ventilation. Where the site and privacy conditions permit, create a reasonably direct relationship between front and rear openings. A living and dining area arranged along this route can allow air to move through the home instead of stopping at enclosed rooms or oversized partitions.
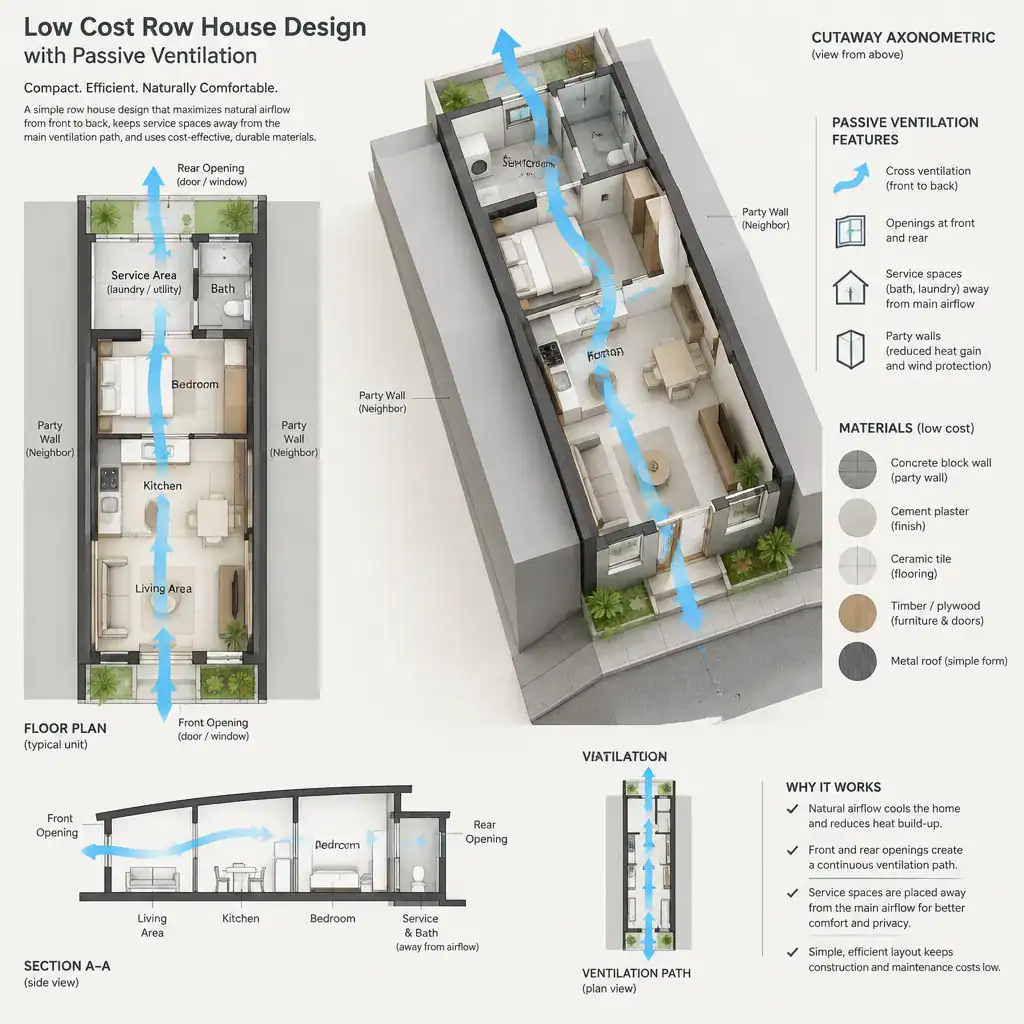
Protect this main route by placing circulation, stairs, bathrooms, storage, and other service functions where they do not unnecessarily block the primary living spaces. These rooms may occupy deeper or less favorable areas, while connected living zones receive the benefit of the available openings. Internal doors and partitions should also be considered early, since a closed-off plan can weaken an otherwise sensible front-to-back arrangement.
A simple footprint is generally easier to build and can preserve more usable area than a plan with many corners, narrow leftover passages, or complicated projections. This does not mean every room must be completely open. The goal is to make each enclosure purposeful while retaining connected paths for air, light, and daily movement. In a low cost row house design with passive ventilation, this early layout work can avoid costly changes after walls and services are already set out.
Use Openings, Internal Connections, and Height Differences for Passive Ventilation
Operable windows bring outdoor air into a room, but they work best as part of a coordinated sequence. A lower inlet window, connected internal openings, and a suitable outlet elsewhere can support a more continuous path than isolated windows selected room by room. Transoms above doors, louvered doors, high-level vents, and carefully located internal openings can help maintain connection when privacy or circulation requires rooms to be separated.
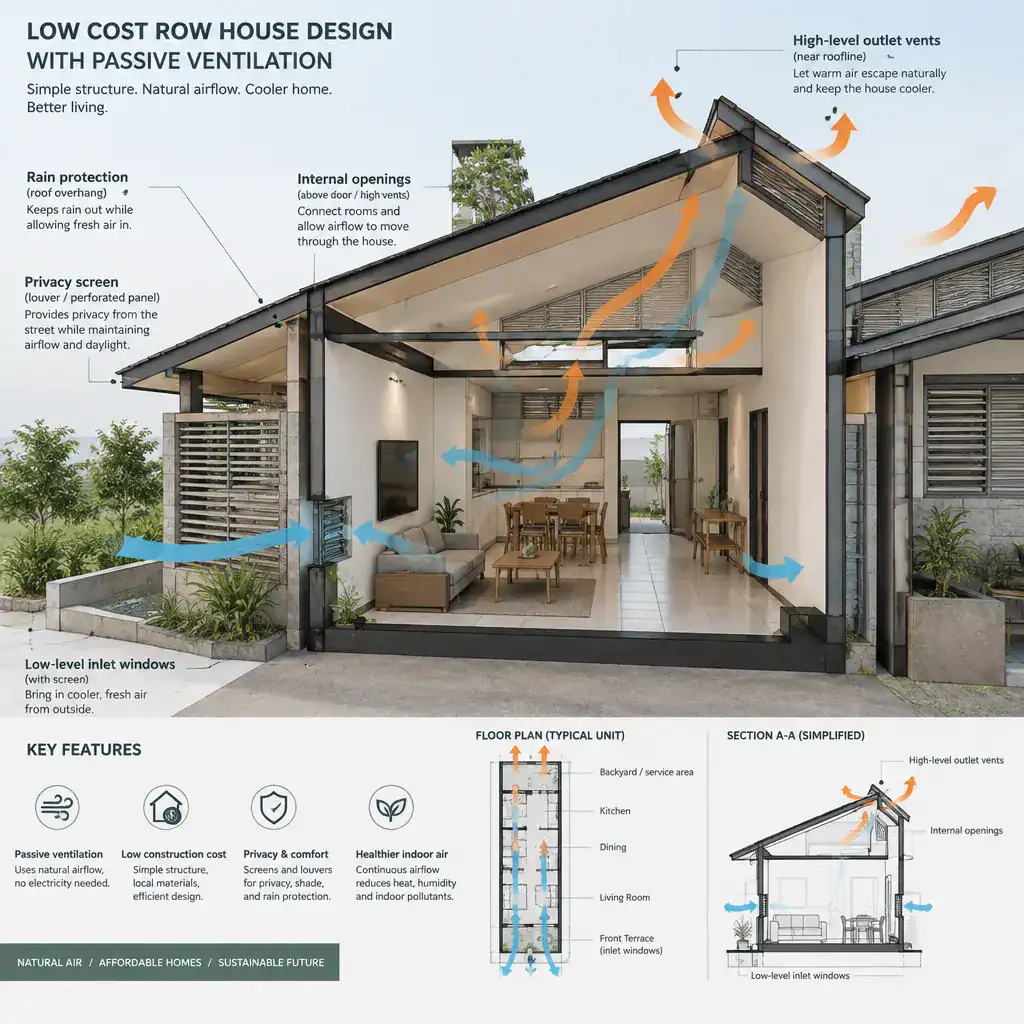
Height can also be useful. Warm air tends to rise, so higher openings near a stairwell, upper wall, or roofline may provide a route for warmer indoor air to leave while lower openings admit replacement air. The actual effect will depend on local temperature, wind, surrounding buildings, opening sizes, and how occupants use the house; it should not be assumed to deliver a fixed result.
Every opening has duties beyond airflow. Window placement must account for wind-driven rain, security, street noise, overlooking, insects, cleaning access, and applicable regulations. A protected operable window or screened high vent may be more practical than a larger opening that residents keep shut because it exposes the house to weather or lacks privacy.
Add Low-Cost Shading and Envelope Strategies Before Upgrading Equipment
Keeping strong sun off walls and glass can make naturally ventilated rooms easier to use. Simple roof overhangs, recessed windows, exterior shade screens, and appropriate window coverings can reduce unwanted solar heat before it enters the interior. These measures are often most affordable when included in the facade and roof design from the beginning rather than added as decorative afterthoughts.
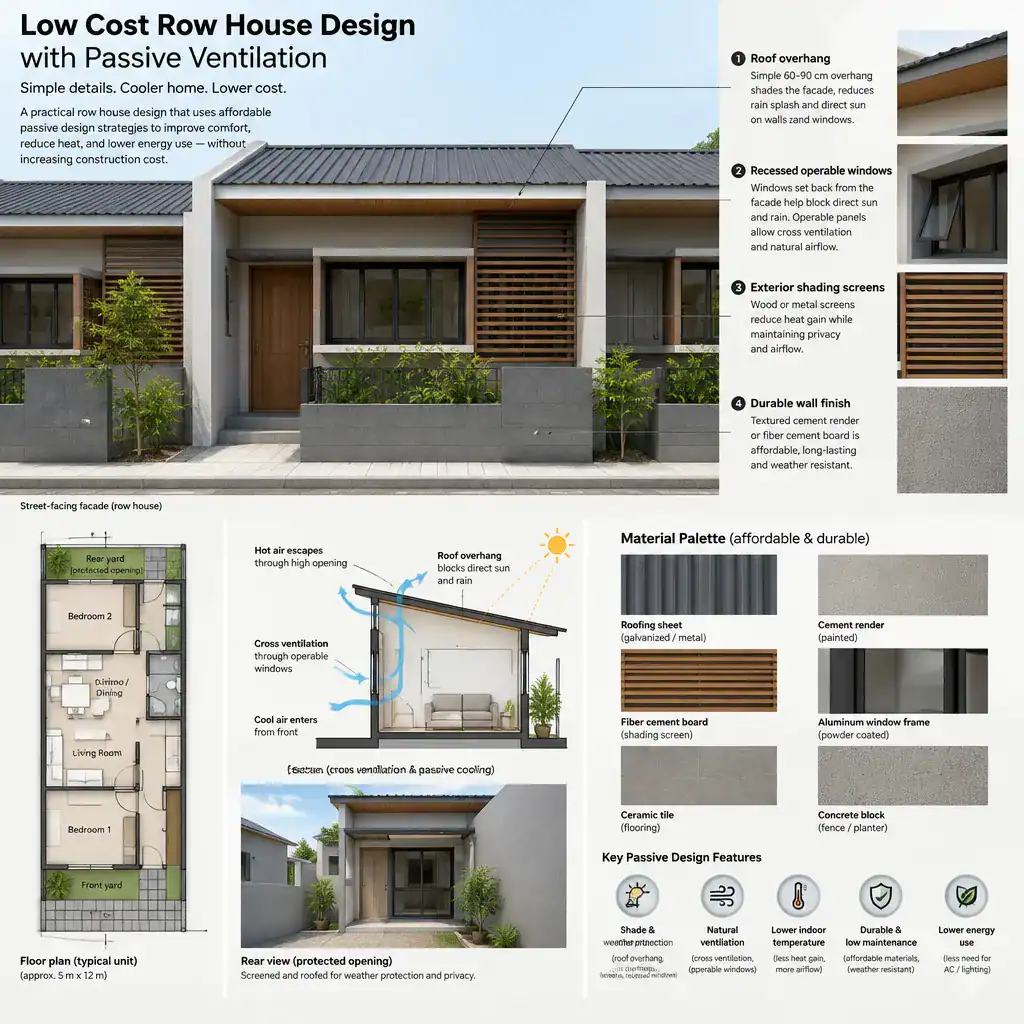
Choose durable, locally available materials that suit the expected weather exposure and the project budget. A straightforward wall finish, a well-detailed roof edge, and robust screens can be more valuable than complex components that are difficult to repair or replace. Protecting window and door openings from rain also makes residents more likely to use them when conditions allow.
Planned ventilation is different from uncontrolled leakage. Sealing unintended gaps around the envelope and detailing openings to resist weather can help occupants control when and where air enters. Passive measures do not replace mechanical ventilation where it is required, nor are they the same as air-conditioning or specialist high-performance systems. Instead, they establish a sound baseline before equipment upgrades are considered.
Balance Airflow With Privacy, Noise, Security, and Everyday Use
Front-to-back airflow can be difficult in dense neighborhoods where the street facade is exposed and the rear boundary is close to another property. Privacy louvers, offset views, screened openings, planted buffers where feasible, or a protected internal route can make ventilation more usable without putting household life on display. The best solution is often one that gives occupants several safe ways to adjust openings throughout the day.
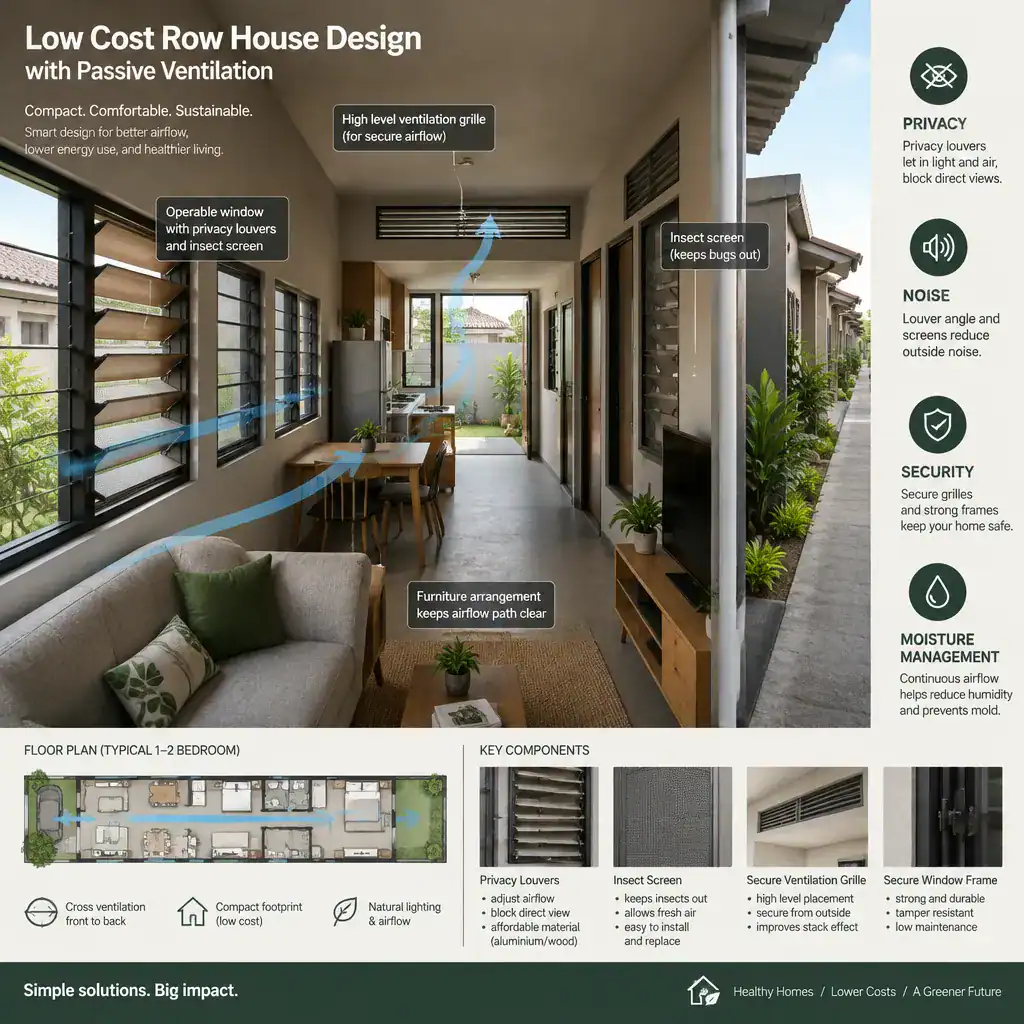
Open windows can admit street noise, dust, outdoor pollution, insects, rain, and unwanted access. Consider insect screens, secure ventilation grilles, rain protection, acoustically thoughtful placement, and opening types that can be partly operated. Kitchen and bathroom areas deserve separate attention because moisture and odors may need dedicated extraction or code-compliant ventilation rather than relying on the same strategy used for living rooms and bedrooms.
Test the proposed plan with real furniture and routines before it is finalized. Tall cabinets, sofas, curtains, or closed internal doors can interrupt a route that looks clear on a drawing. Think about sleeping, cooking, bathing, receiving guests, and securing the house at night. This review helps turn a low cost row house design with passive ventilation into a home that works for everyday use, not only for a diagram.
A Practical Planning Checklist for a Low-Cost Ventilated Row House
Before construction, review the project as one connected system. Check the orientation and seasonal exposure of the site, the effect of attached walls, the location and usability of front and rear windows, possible high-level outlets, shading at exposed facades, and the placement of bathrooms, kitchen areas, stairs, storage, and other service spaces. Leave practical furniture clearance so that the intended air path is not immediately obstructed after move-in.
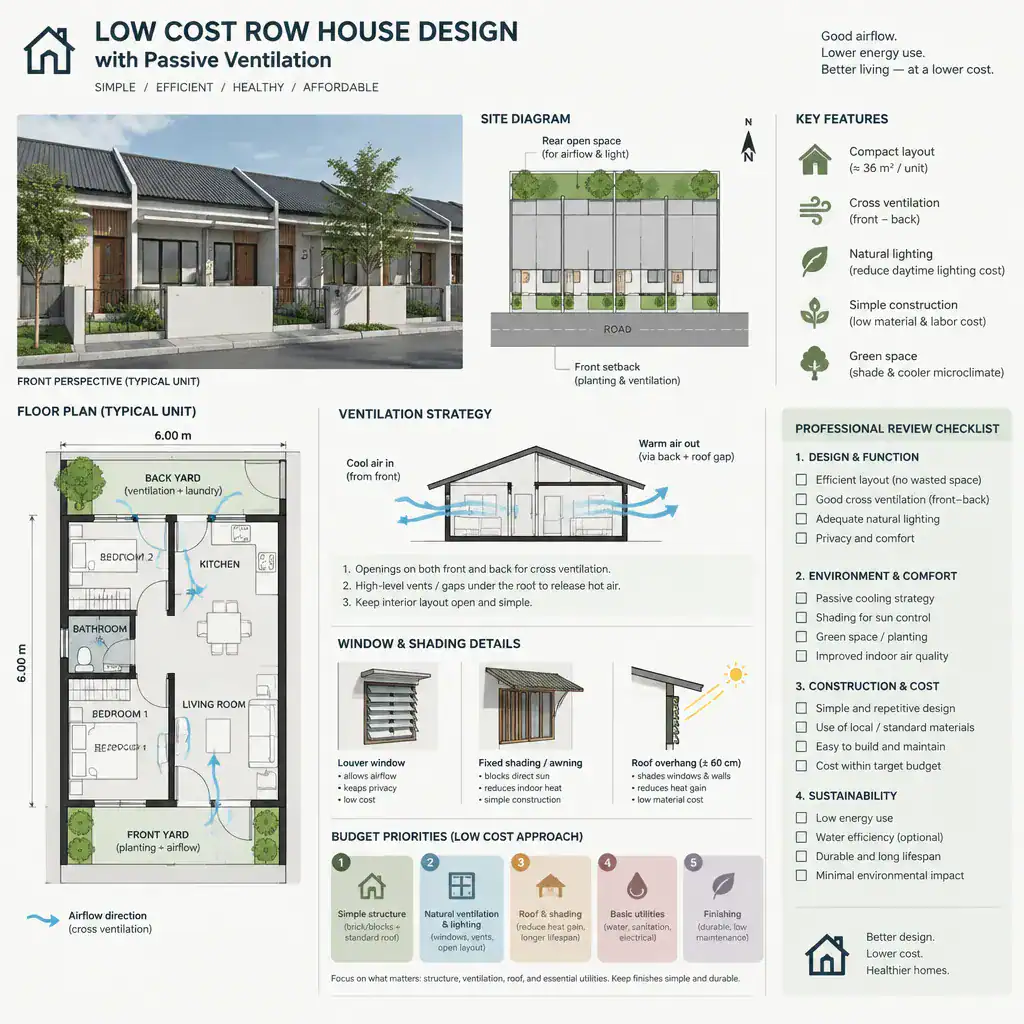
Confirm key decisions against local climate information, planning restrictions, fire safety rules, property boundaries, and building codes. Window types, security details, bathroom and kitchen ventilation, roof vents, and openings near boundaries can all be regulated differently by location. A concept that is sensible on paper may need adjustment to meet approval requirements or site-specific safety needs.
Coordinate early with the homeowner, architect or designer, builder, and relevant building professionals. Review the drawings at different times of day and consider likely weather conditions, nearby buildings, prevailing exposure, and household habits. This process will not promise a particular ventilation outcome, but it can reveal conflicts between budget priorities and comfort goals while changes are still easier to make.
The most cost-effective decisions for passive ventilation are usually made during site planning, floor-plan development, opening placement, and shading design. A clear route for air, sensible protection from sun and rain, and well-positioned service spaces can support comfort without unnecessary complexity. Balance these choices with privacy, security, weather protection, everyday use, and local compliance, then validate the final concept with qualified local professionals before construction.